Getting Started
The ReEDS model source code is available at no cost from the National Renewable Energy Laboratory. The ReEDS model can be downloaded or cloned from https://github.com/NREL/ReEDS-2.0.
New users may also wish to start with some ReEDS training videos which are available on the NREL YouTube channel at https://youtu.be/aGj3Jnspk9M?si=iqCRNn5MbGZc8ZIO.
Computer Setup for Microsoft Windows 10
The setup and execustion of the ReEDS model can be accomplished using a command-line interpreter application and launching a command line interface (referred to as a “terminal window” in this documentation). For example, initiating the Windows Command Prompt application, i.e., cmd.exe, will launch a terminal window Fig. 1. (Note: If you have issues using command prompt, try using anaconda prompt or a git bash window)

Fig. 1 Screenshot of a Windows Command Prompt terminal window
SUGGESTON: use a command line emulator such as ConEmu (https://conemu.github.io/) for a more user-friendly terminal. The screenshots of terminal windows shown in this document are taken using ConEmu.
IMPORTANT: Users should exercise Administrative Privileges when installing software. For example, right click on the installer executable for one of the required software (e.g., Anaconda3-2019.07-Windows-x86_64.exe) and click on “Run as administrator” (Fig. 2). Alternatively, right click on the executable for the command line interface (e.g., Command Prompt) and click on “Run as administrator” (Fig. 3). Then run the required software installer executables from the command line.
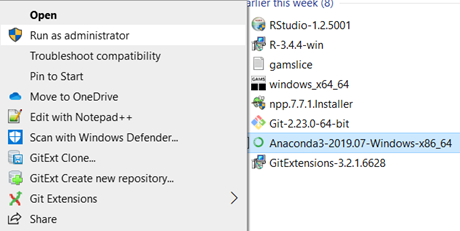
Fig. 2 Screenshot of running an installer executable using “Run as administrator”
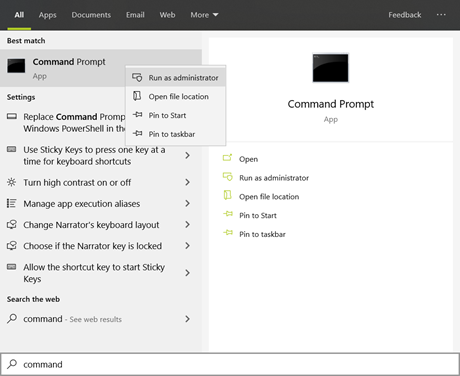
Fig. 3 Screenshot of running “Command Prompt” with “Run as administrator”
Python Configuration
Install Anaconda: https://www.anaconda.com/download.
IMPORTANT : Be sure to download the Windows version of the installer.
Add Python to the “path” environment variable
In the Windows start menu, search for “environment variables” and click “Edit the system environment variables” (Fig. 4). This will open the “System Properties” window (Fig. 5).
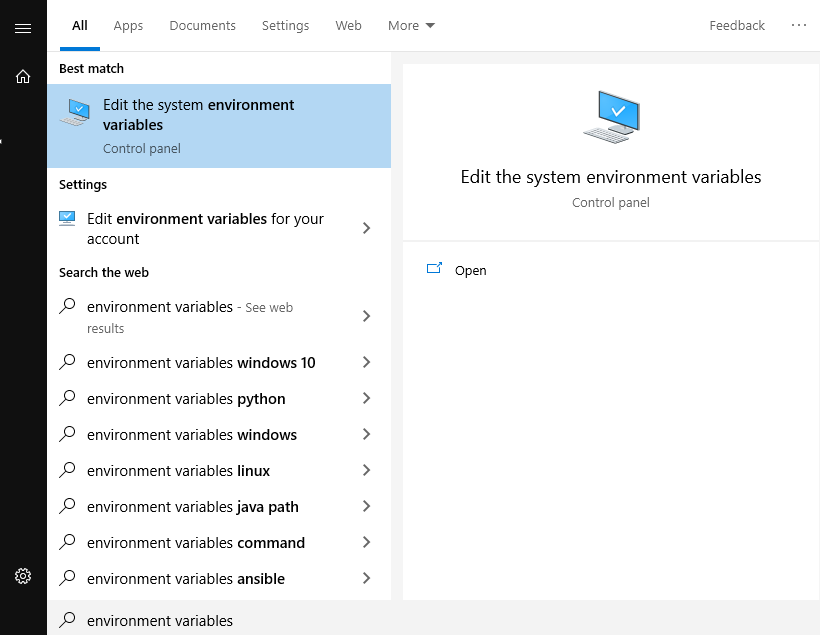
Fig. 4 Screenshot of a search for “environment variables” in the Windows start menu
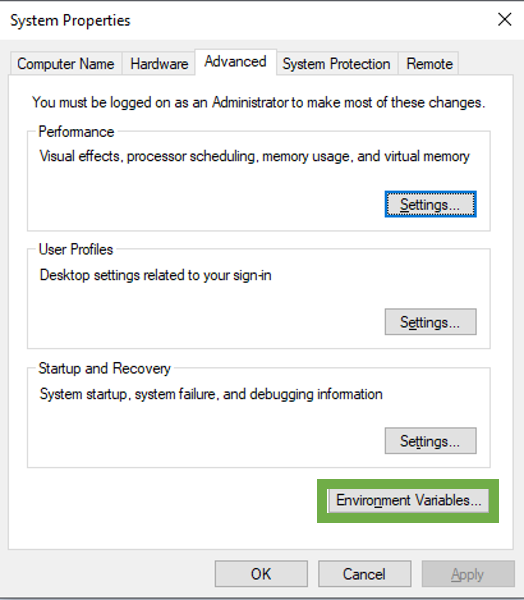
Fig. 5 Screenshot of the “System Properties” window.
Click the “Environment Variables” button on the bottom right of the window (Fig. 5). This will open the “Environment Variables” window (Fig. 6).
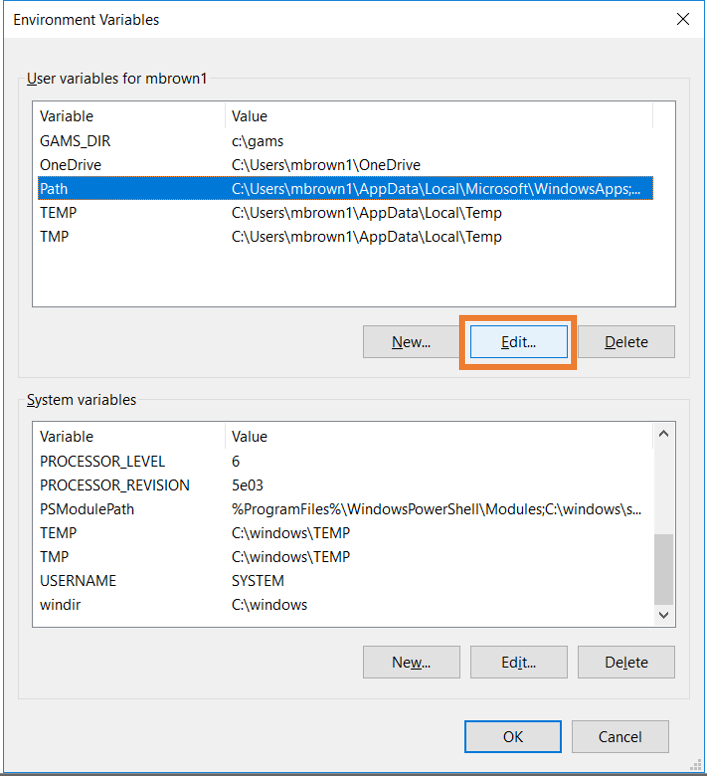
Fig. 6 Edit the Path environment variable
Highlight the Path variable and click “Edit” (Fig. 6). This will open the “Edit environment variable” window (Fig. 7).
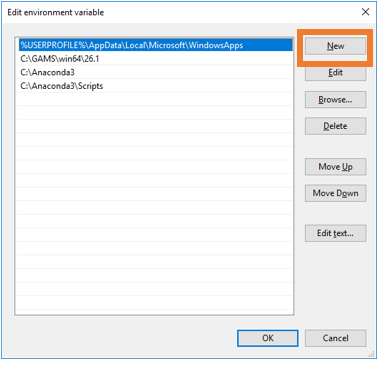
Fig. 7 Append the Path environment
Click “New” (Fig. 7) and add the directory locations for \Anaconda\ and \Anaconda\Scripts to the environment path.
IMPORTANT : Test the Python installation from the command line by typing “python” (no quotes) in the terminal window. The Python program should initiate (Fig. 8).

Fig. 8 Screenshot of a test of Python in the terminal window
It is highly recommended to run ReEDS using the conda environment provided in the repository. This environment (named reeds2) is specified by the environment.yml and can be built with the following command:
conda env create -f environment.yml
You can verify that the environment was successfully created using the following (you should see reeds2 in the list):
conda env list
When creating the reeds2 environment locally, you might run into an SSL error that looks like: CondaSSLError: Encountered an SSL error. Most likely a certificate verification issue. To resolve this issue, run the following command before creating the environment again: conda config --set ssl_verify false.
GAMS Configuration
Install GAMS: https://www.gams.com/download/. NREL uses GAMS versions 49.6.0 and 45.2.0. Older versions might also work. A valid GAMS license must be installed. Please refer to the Required Software section above for more information.
Add GAMS to the “path” environment variable. Follow the same instructions as for adding Python to the path in the Python Configuration section above. Append the environment path with the directory location for the gams.exe application (e.g., C:\GAMS\win64\34).
IMPORTANT : Test the GAMS installation from the command line by typing “gams” (no quotes) in the terminal window. The GAMS program should initiate (Fig. 9).
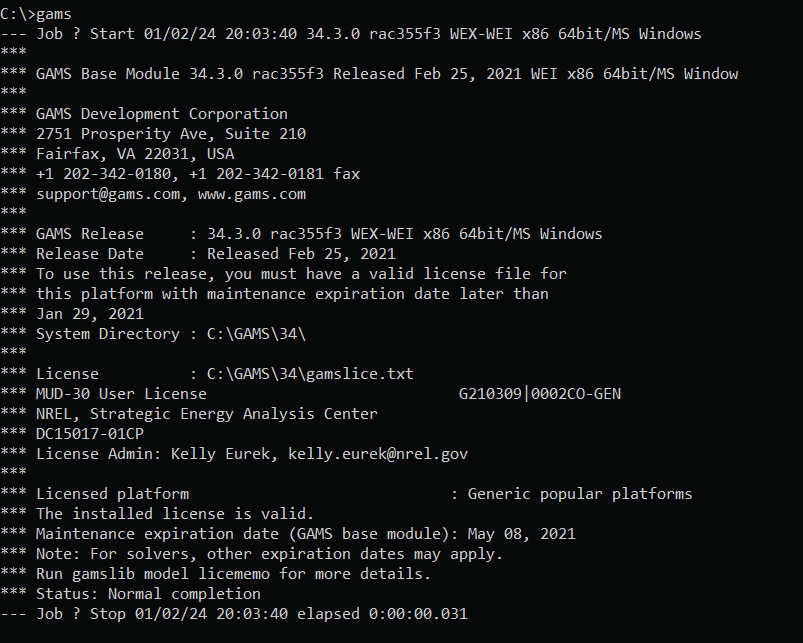
Fig. 9 Screenshot of a test of GAMS from the terminal window
ReEDS Repository Setup
The ReEDS source code is hosted on GitHub: https://github.com/NREL/ReEDS-2.0
Install Git Large File Storage, instructions can be found here: Installing Git Large File Storage
From the Git command line run the following command to enable large file storage.
git lfs install
Clone the ReEDS-2.0 repository on your desktop. Alternatively, download a ZIP from GitHub (Fig. 10).
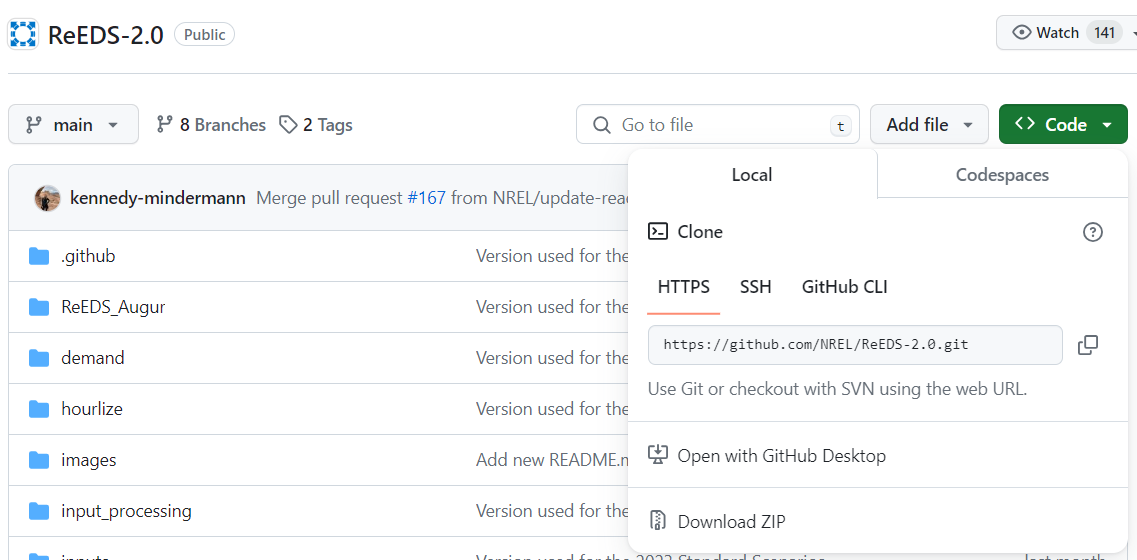
Fig. 10 Screenshot of GitHub links to clone the ReEDS repository or download ZIP of the ReEDS files
Computer Setup for MacOS
Python Configuration
Download the latest Intel version of Anaconda: https://www.anaconda.com/download
IMPORTANT: Make sure to download the Intel version even if your machine has an Apple Silicon / ARM processor.
During Installation, select to install Anaconda for your machine only.
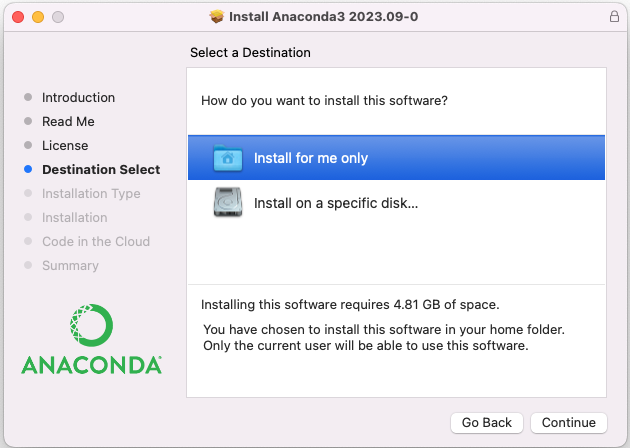
Fig. 11 Image of Anaconda Install Mac
To have the installer automatically add anaconda to PATH, ensure that you’ve selected the box to “Add conda initialization to the shell”
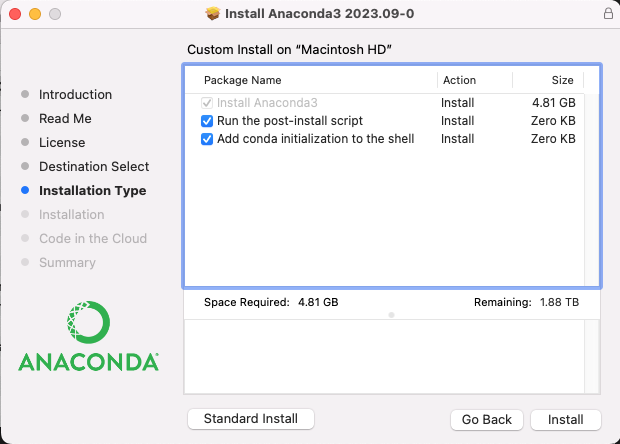
Fig. 12 Image of Anaconda Install Mac - Customize Installation Type
To validate Python was installed properly execute the following command from a new terminal (without quotes): “python”
Python should initiate, looking similar to Fig. 8.
It is highly recommended to run ReEDS using the conda environment provided in the repository. This environment (named reeds2) is specified by the environment.yml and can be built with the following command - make sure you navigate to the ReEDS repository from terminal first:
conda env create -f environment.yml
You can verify that the environment was successfully created using the following (you should see reeds2 in the list):
conda env list
GAMS Configuration
Install GAMS: https://www.gams.com/download/. A valid GAMS license must be installed. Please refer to the Required Software section above for more information.
IMPORTANT: When installing on Mac, on the ‘Installlation Type’ page, click ‘customize’ and ensure the box to ‘Add GAMS to PATH’ is checked.
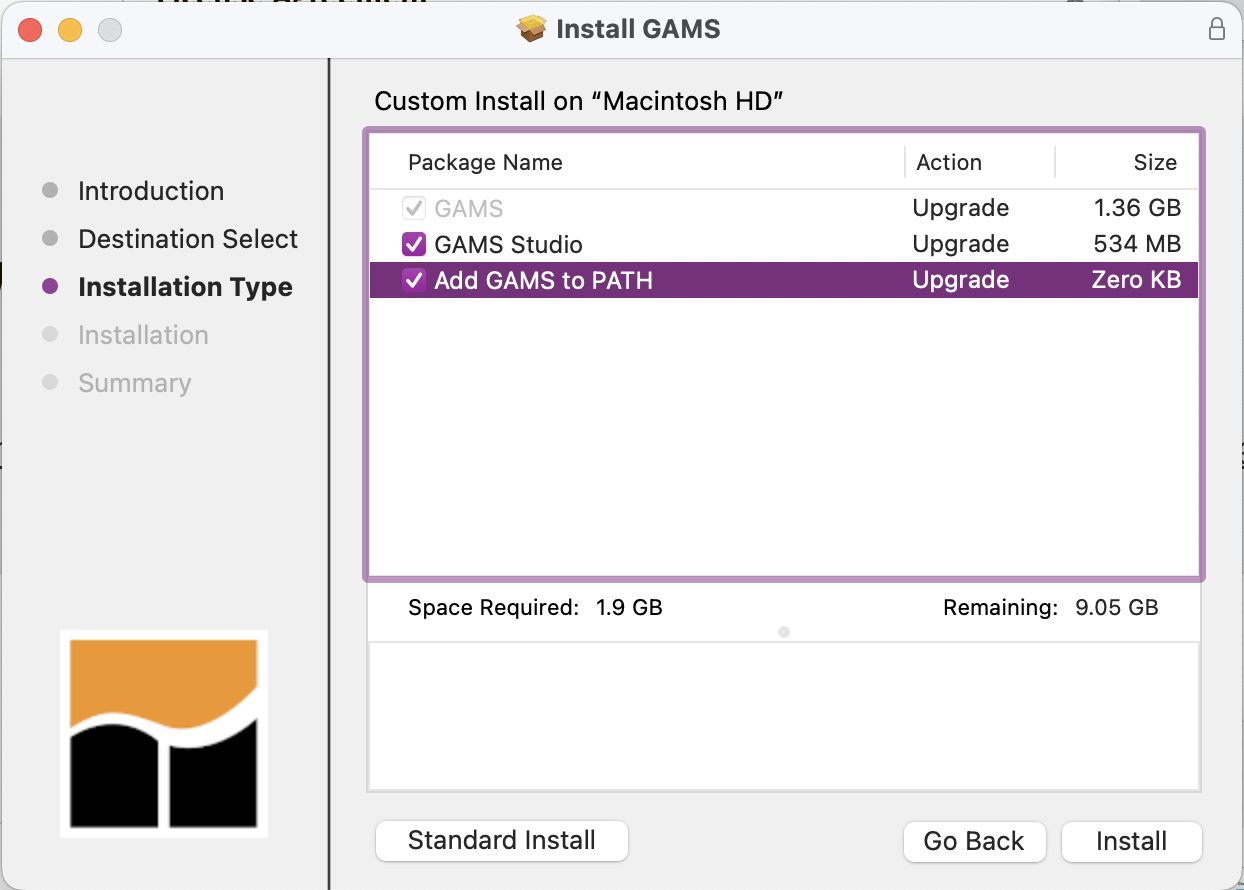
Fig. 13 Image of GAMS Install Mac
To validate GAMS was installed properly execute the following command from a new terminal (without quotes): “gams”
GAMS should initiate, you should see something similar to Fig. 9.
ReEDS Repository Setup
The ReEDS source code is hosted on GitHub: https://github.com/NREL/ReEDS-2.0
Install Git Large File Storage, instructions can be found here: Installing Git Large File Storage
From the Git command line run the following command to enable large file storage.
git lfs install
Clone the ReEDS-2.0 repository on your desktop and use the repository with GitHub Desktop. Alternatively, download a ZIP from GitHub (Fig. 10).
ReEDS2PRAS, julia, and stress periods setup
Since ReEDS uses stress periods by default, julia will need to be installed and set up to run the model. To get julia and stress periods set up:
Install Julia. There are different procedures for mac/linux and windows.
[mac/linux]: Julia is included in the conda environment so you should be all set.
[windows]: Install Julia from https://julialang.org/downloads/.
From the ReEDS-2.0 directory, run
julia --project=. instantiate.jl
Set GSw_PRM_CapCredit=0 in your ReEDS cases file to use the coupled ReEDS/PRAS stress periods model, or just set pras=2 to run PRAS without necessarily using stress periods.
Troubleshooting Issues with Julia Setup
When setting up julia on Windows, you may run into some issues when running julia --project=. instantiate.jl. The following steps can be followed to help resolve issues and get julia set up sucessfully:
Manually install Random123
Re-run
julia --project=. instantiate.jl
If that doesn’t resolve the issue, the following may help:
If you previously installed julia, uninstall it:
winget uninstall juliaManually install Julia 1.8.5
Add the julia bin path to your environment PATH variable
Install MinGW
Open the julia interactive command line:
juliaEnter the julia package manager by pressing
], then run the following commands:add Random123registry add https://github.com/JuliaRegistries/General.gitregistry add https://github.com/NREL/JuliaRegistires.gitinstantiate
Leave the package manager by pressing backspace or Ctrl+C
Run the following commands to finish setup:
import PRASimport TimeZonesTimeZones.build()
You can then leave the julia command line by typing
exit()
If you’re experiencing issues on Mac, a possible solution is:
Update the version of julia
Create the ‘reeds2’ conda environment with the environment.yml file
Run
juliafrom the terminal to open the interactive command lineRun
import Pkg; Pkg.add("PRAS")Run
Pkg.add("TimeZones")Exit julia with the command
exit(), then runjulia instantiate.jlManually move the Manifest.toml file from the julia environment (~/miniconda3/envs/reeds2/share/julia/environments/reeds2/Manifest.toml) to the ReEDS repo
Executing the Model
A ReEDS case (also referred to as a “run”, “scenario” or “instance”) is executed through a python-based case batching program called runbatch.py after the repository was setup. The user can execute a single case or a batch of cases using this program.
Understanding the cases.csv file
ReEDS model switches are set in the cases.csv file and need to be specified by the user. The default case configuration file is called “cases.csv”.
Within “cases.csv”, the data in column A are the model “switches”. Column B contains a brief description of each switch. Column C contains the choices available for the given switch (please note, this is not available for all switches). Column D contains the default value for the switch. Finally, the case configuration (or set of switches that define a case) is in column E.
Within column E, the case name is specified in row 1. The value for each switch is specified beginning in row 2. If a switch value is left blank, the default value from column D is used.
Note: all monetary switches should be entered in 2004 dollars.
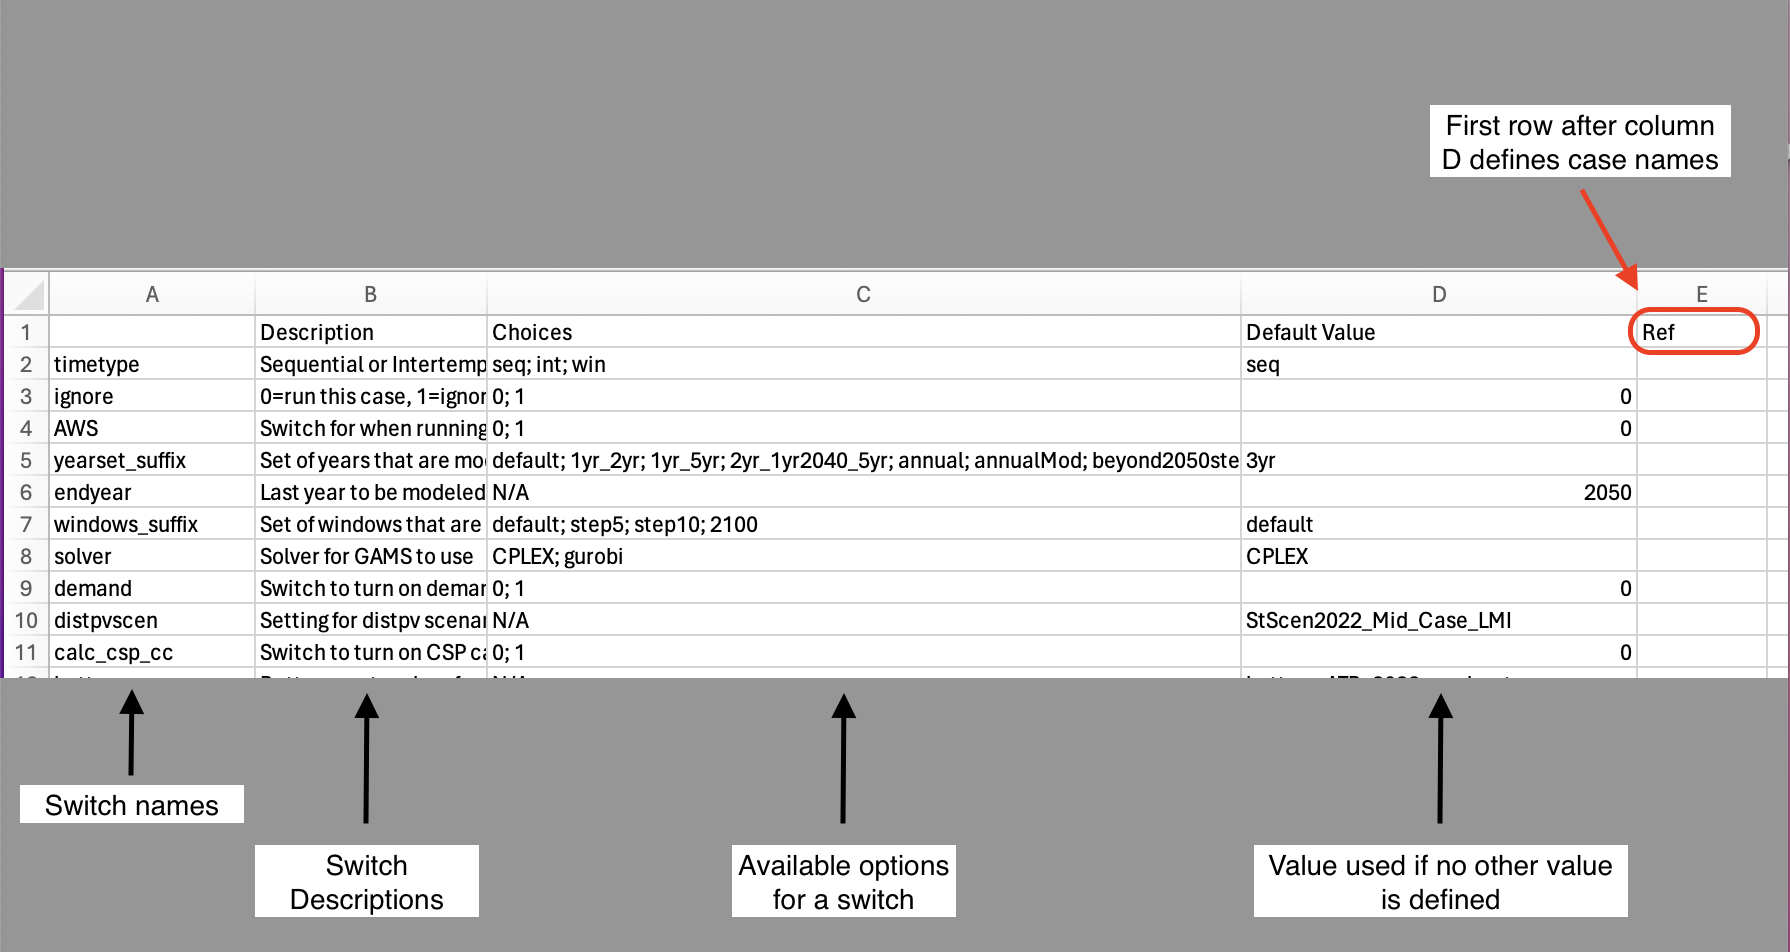
Fig. 14 Screenshot of cases.csv
There are additional cases_*.csv files that can also be used to run different ReEDS scenarios. The two most commonly used are:
cases_standardscenarios.csv: contains all the scenarios that were used for Standard Scenarios
cases_test.csv: contains a group of “test” cases that vary specific settings within the model for testing various capabilities
The user may also create custom case configuration files by using the suffix in the file name (e.g., “cases_smalltests.csv”). It should follow the same column formatting as cases.csv, but does not need to include all available switches.
Calling runbatch.py to run ReEDS
Navigate to the ReEDS directory from a new command prompt or terminal.
Activate the
reeds2conda environment:conda activate reeds2Call runbatch.py:
python runbatch.pyIt should look similar to Fig. 15
Provide responses to the suite of prompts in the command line. For more information about the prompts, see the Prompts for user input during runbatch.py section.
Once all responses have been received, the batching program will execute the case(s) specified in the case configuration file (e.g., “cases.csv”).
Please note, if you’re running ReEDS on Windows, a separate terminal window will be launched for each case.
For each case that is run, a new subfolder will be created under the “runs/” subdirectory of ReEDS. If you run the default case found in “cases.csv”, you can expect to find the outputs from the run at “/ReEDS-2.0/runs/{batch prefix}_Ref/outputs”.
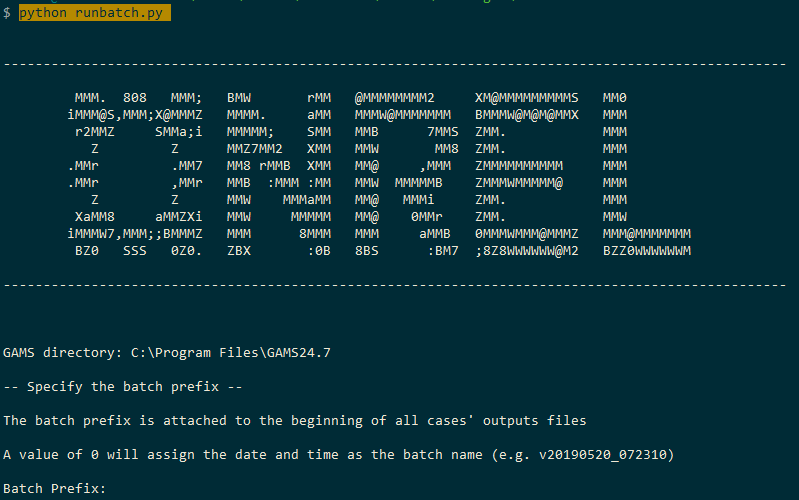
Fig. 15 Screenshot of initiating “runbatch.py” from the command line
Prompts for user input during runbatch.py
Batch Prefix [string] - Defines the prefix for files and directories that will be created for the batch of cases to be executed (as listed in a case configuration file, e.g., “cases.csv”)
All files and directories related to a case will be named “{batch prefix}_{case}”. For example, if batch prefix = “test” and case = “Ref”, then all files and directories related to this case will be named test_Ref.
Important: A batch prefix cannot start with a number given incompatibility with GAMS.
Entering the value of “0” (zero, no quotes) will assign the current date and time for the batch prefix in the form of v{YYYMMDD}_{HHMM}.
If you re-use a (batch prefix, case) pair, a new prompt will appear asking if you want to overwrite the existing output directories.
Case Suffix [string] - Indicates which case configuration file (in the form “cases_{case suffix}.csv”) is ingested into “runbatch.py” for processing.
Entering an empty value(i.e., pressing “Enter/Return”) will cause the default case configuration file “cases.csv” to be used
Number of Simultaneous Runs [integer] - Indicated how many cases should be run simultaneously.
“runbatch.py” uses a queue to execute multiple cases
If there are 4 cases and the Number of Simultaneous Runs = 1, then “runbatch.py” will execute the cases one at a time
However, if there are 4 cases and the Number of Simultaneous Runs = 2, then “runbatch.py” will start 2 cases simultaneously
As each case finishes, it will start a new one until all cases have been run
WARNING! Be mindful about the amount of CPU and RAM usage needed for each case
Checking the outputs
To check if a run was successful, you can look in the following two places:
The ‘runs/[batchname_scenario]/outputs’ folder should have csv files, if it doesn’t, something went wrong.
There should be a ‘reeds-report’ and reeds-report-reduced’ folder in the outputs folder for a specific run.
Special Case Setup Requirements
For non-NREL users, some additional data is required to run the ReEDS model at the ‘county’ spatial resolution. This is currently considered a special case and some data was required to be kept outside the ReEDS repository because the data is simply too large. The hourly renewable capacity factor data is now available to all at : https://data.openei.org/submissions/5986.
If you would like to run the model at county resolution, you are requested to download the files available from the link provided, unzip each folder, and place the files obtained into inputs/variability/multi-year in your locally cloned ReEDS repository. The input_processing scripts have also been updated to check for these files for any county-level runs. The ‘cases_spatialflex.csv’ file provides examples of specific switch settings to run ReEDS at county-level.
NREL Specific Setup
For more information on NREL specific setup, refer to the Internal ReEDS Documentation. You can find information there on Yampa and HPC setup, as well as the onboarding guide.
Additional Resources
NREL has a YouTube channel that contains tutorial videos for ReEDS. The following are recommended videos for getting started with ReEDS:
Overview of ReEDS
Getting started with ReEDS: 2023 ReEDS Training for User Group Meeting
How to change inputs: Training on Changing and Adding Inputs
Debugging of ReEDS: Training on Debugging ReEDS
If you’d like practice with running a specific ReEDS scenario, you can walk through the ReEDS Training Homework.
Additional resources and learning: