How to process and format PLEXOS results with Marmot#
This guide will show you how to setup Marmot to process PLEXOS results. The guide will focus on using the Marmot_user_defined_inputs: csv file to correctly point to PLEXOS outputs and scenarios.
PLEXOS results folder structure & H5PLEXOS files#
PLEXOS outputs results in a .zip format, this allows easy viewing in the PLEXOS GUI but it is not natively compatible with Marmot. To improve data accessibility, H5PLEXOS converts PLEXOS .zip files to a hdf5 format. Marmot requires all PLEXOS results to be in this format before they can be processed. If you have not yet converted your .zip files to a .hdf format, follow the instructions on the H5PLEXOS repo.
The Marmot/example-data/hourly folder represents a typical folder structure for PLEXOS results. This folder contains two sub-directories, Base DA and High VG DA. They each contain data that are grouped together under the same scenario. The name of these sub-directories is used as scenario identifiers when formatting results with Marmot, this will be explained in the next section of this guide. Depending on how a user has setup their PLEXOS model, this folder should contain 1 or more files that are temporally disaggregated.

These scenario folders contain two files each, broken into monthly data sets.
Setting up the Marmot input files#
Open the Marmot_user_defined_inputs: csv file located in the Marmot/input_files directory.
You can either edit this file directly or preferably make a copy of it and use the config: yml file to make it the default input file as described in the How-to Guide, How to change default input files with the config.yml
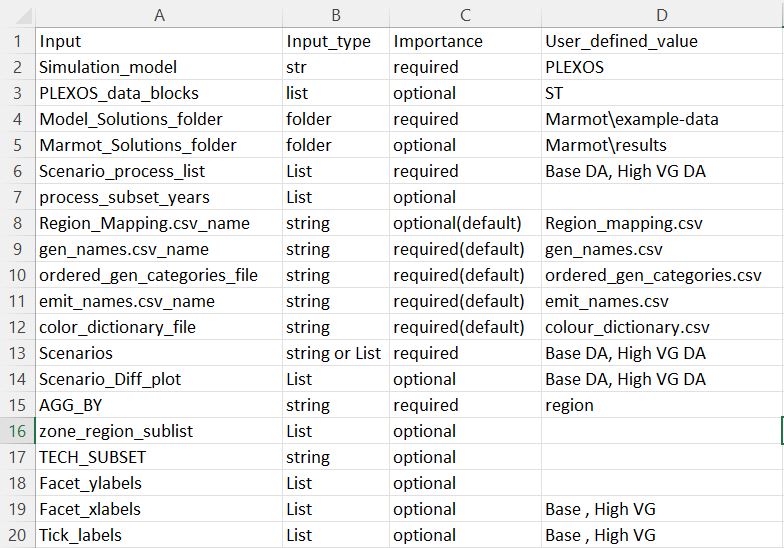
If you open the file in a spreadsheet program such as Microsoft Excel you will see the following structure:

The file has 4 columns, with column D used for adjusting input. To format ReEDS results we will just need to adjust values for rows 2-6 as above.
Simulation_model lets Marmot know what model it is formatting, set this to PLEXOS.
PLEXOS_data_blocks specifies which PLEXOS simulation phase you want to process. It accepts one or more of the following: ‘ST’, ‘MT’, ‘LT’ or ‘PASA’. If left blank will default to processing the ST phase.
Note
If processing multiple result sets of different types, be sure to set formatter_settings: append_plexos_block_name to true in the config: yml file before formatting data. If this value is not set to true, results will be saved to the same “_formatted.h5” file which may result in overwritten data.
Model_Solutions_folder should point to the parent of your scenario folders, this would be the hourly folder in the previously shown example.
Marmot_Solutions_folder is the location where Marmot will save its formatted results, set this to any conveniant location.
Scenario_process_list identifies the scenarios we want to process with the formatter. This should include the name of the scenario folder you want to process. e.g Base DA and High VG DA. If you want to format multiple PLEXOS scenarios and they are in the same Model_Solutions_folder directory, include them here comma separated.
Next open the plexos_properties: csv file also located in the input_files directory. This file determines which PLEXOS properties to process with Marmot. The data_set corresponds to the PLEXOS output property, while group specifies the associated PLEXOS class. Set whatever property you want to process to True using the collect_data column. This file is explained in detail in the Input File References section.
After these values have been set, you are ready to run Marmot. Follow the Start Marmot formatter section of the Running the Marmot code guide if you are unsure of how to do this.
Marmot will then begin formatting your properties and will print messages to the terminal. Once completed the formatted outputs will be in a new folder called Processed_HDF5_folder within the Marmot_Solutions_folder you set above.